Don’t get banned with your brand new Stripe account. Stripe is the most popular payment processor because it’s simple to setup, but it’s easy to get your settings wrong. In this guide we’ll go through the most important settings in your Stripe account to optimize it for B2C SaaS.
Optimizing a Stripe account for B2C SaaS
This guide assumes you have created a Stripe account and are ready to start accepting payments. If you haven’t done that yet, you can sign up for a Stripe account here.
Subscriptions
The backbone of all SaaS is subscriptions. You want to make it as easy as possible for your customers to subscribe to your product. We highly recommend Stripe’s Billing product for this. It’s an additional fee on top of the standard Stripe fees, but it’ll save you a bunch of time and you avoid having to use an additional service to manage subscriptions.
Setting up subscriptions
Stripe has a few key concepts here:
- Products: This is the thing you are selling. It could be a subscription, a one-time purchase, or a usage based product.
- Plans: This is the pricing for your product. You can have multiple plans for a single product. For example, you could have a monthly plan and an annual plan.
Example: If you have a Basic and Pro plan with month and annual pricing. Setup your products like this:
- Basic product
- Basic monthly plan
- Basic annual plan
- Pro product
- Pro monthly plan
- Pro annual plan
This lets you use cross-sells and upsells in your checkout flow (which is built into Stripe Checkout).
Optimizing your checkout experience
Again, we recommend the built in Stripe checkout experience. It’s optimized to maximize conversions. If you are creating your own checkout or using a third party, you risk losing out on customers because of bugs, slow loading times or trust issues. Customers trust Stripe, so use it.
💡 Here are some tips:
- Customize the design: You can customize the design of the checkout to match your brand. This is important for trust.
- Embed the checkout: You can embed the checkout directly on your site. This is important for conversions. Fewer clicks = better conversion rates.
Guests customers
By default, Stripe will create guest customers during checkout. This causes headaches because the payments are not linked to a customer in Stripe. The payments appear in the Stripe dashboard under “related guest payments” but are never returned by the API. Disable this during your checkout flow using customer_creation: always (see this guide)
Preventing chargebacks
The quickest way to get banned by Stripe is to start off with a bunch of chargebacks. Chargebacks are when a customer disputes a charge with their bank. This is bad for you because:
- Stripe charges you a $15 fee for each chargeback.
- You don’t get the fee back even if you win the dispute.
- You lose the initial payment too if you lose the dispute.
- You don’t get the Stripe fees on the payment back.
Stripe Radar
We recommend using Stripe Radar if you are selling B2C SaaS (if you are B2B you may not need it). Radar costs another extra fee on top of the regular Stripe fees but it will help you avoid chargebacks.
Stripe Radar comes with some rules by default. There are three lists: block, review and allow. Rules in the block list will block the payment, rules in the review list will flag the payment for manual review and rules in the allow list will always allow the payment if it matches the rule. Be careful with allow rules particularly.
💡 Recommended rules
Here are some rules we recommend you enable:
Block if: declined_charges_per_customer_hourly: > 3Block if :dispute_count_on_card_number_all_time: > 0Block if :card_count_for_ip_address_daily: > 4Block if :blocked_charges_per_ip_address_hourly: > 1Review if :is_disposable_email: and :card _funding:= 'prepaid'
These rules will help prevent card testing (somone testing stolen cards on your site) and fraud. You can find more rules in the Stripe Radar documentation.
Early Fraud Warnings
Stripe also provides early fraud warnings which appear in the Stripe dashboard and also by email. These are warnings that a payment may be fraudulent. You can use these to refund the payment before it becomes a chargeback. Stripe recommends that you refund the payment within 24 hours of receiving the warning.
Subscription renewal emails
Stripe Billing can automatically send emails before a trial ends and before a subscription renews. It’s recommended to enable these emails so your customers know when they are going to be charged. This can help prevent chargebacks caused by a customer not recognizing the charge.
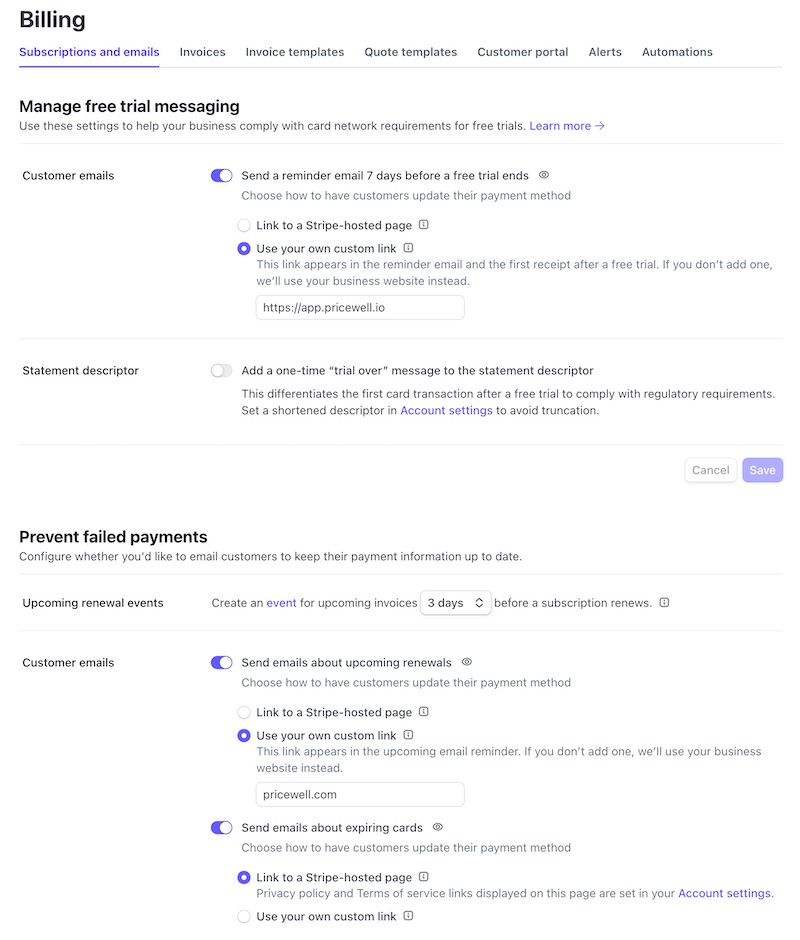
Set a custom statement descriptor
The statement descriptor is what appears on your customer’s bank statement. It’s important to set this to something that your customers will recognize. This can help prevent chargebacks caused by a customer not recognizing the charge.
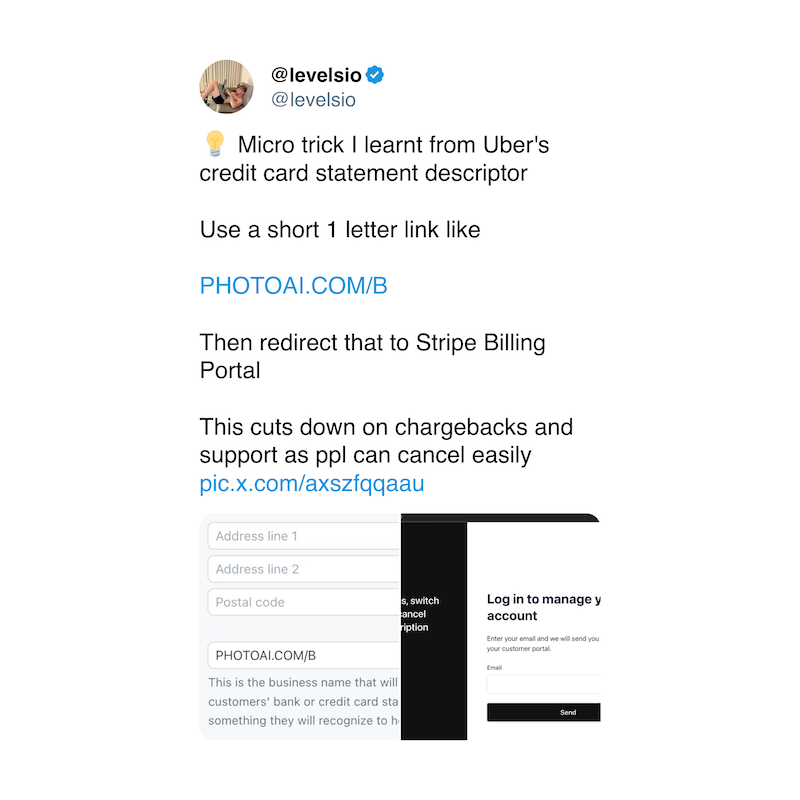
💡 Tip
You can hack the statement descriptor to be a short link that lets your customers know what the charge is for. For example, if you are charging for a subscription to “PriceWell” you could set the statement descriptor to “PriceWell.com/C” which would redirect to the Billing Portal.
Got any more tips?
We’d love to hear your favourite Stripe account settings tips. Tweet us @pricewell with your tips and we’ll add them to this guide and link to you.